How To Use Apple Pay?
Are you tired of fumbling through your purse to find the right card when making a purchase? Or maybe you’re concerned about the security risks involved with using your card at a physical store. If that’s so, you’re in luck! Because Apple Pay can simplify the way you make payments and keep your sensitive information secure.
Today, let’s take a closer look at how Apple Pay works! Also, I will tell you how you can start using it right now. Whether you’re an iPhone or Apple Watch user, I’ve got you covered! By the end of this, I’m sure that your shopping experience will be a tad bit smoother and more secure.
So, keep scrolling to discover the benefits of Apple Pay…
What is Apple Pay?
For starters, Apple Pay is a mobile payment and digital wallet service offered by Apple Inc. It allows you to pay for goods and services with just a tap of your phone or watch. With Apple Pay, you can keep your credit and debit card information on your Apple device. When needed, use it to make purchases at retailers, both in-store and online.
How to set up Apple Pay?
Now, before you begin with Apple Pay, you need to set it up. In case you’re wondering how, check the step-by-step process below on how to get started:
Step 1: Launch the “Wallet” app on your iPhone or iPad.
Step 2: Tap on the plus sign (+) in the upper right corner of the screen.
Step 3: Follow the prompts to add a new credit or debit card.
Step 4: If you have a supported card, just hold your iPhone or iPad’s camera over the card. This will help the app to automatically capture your card info. If that doesn’t work, you can also enter the card details manually.
Step 5: Verify your card by providing any additional information that is requested, such as your billing address or security code.
Step 6: Now, you need to agree to the terms and conditions.
Step 7: Your bank or card issuer may require you to complete additional verification steps. Follow any prompts or instructions provided to finalize the verification process.
Step 8: Once your card is verified, it will be added to your Wallet app and you can start using Apple Pay.
That’s it! With Apple Pay set up, you can use your iPhone or iPad to make purchases at participating merchants offline and even during in-app purchases. Furthermore, you can even send money to friends and family via iMessage.
How to setup Apple Pay on my Apple watch?
The setup process for your Apple watch is almost the same with a few additional steps. Have a look-
Step 1: Launch the “Watch” app on your iPhone.
Step 2: Tap on the “My Watch” tab.
Step 3: Scroll down and tap on the “Wallet & Apple Pay” option.
Step 4: Tap “Add Credit or Debit Card.”
Step 5: Follow instructions from Step 3-7 of “How to set up Apple Pay?”
Step 6: Once your card is verified, it will be added to your Apple Watch and you can start using Apple Pay.
That’s all! Now that you’ve set up Apple Pay on your Apple Watch, you can use it to make purchases. To use Apple Pay on your watch, just double-click the side button and hold your watch near the payment terminal. You’ll feel a slight vibration on your wrist when the payment is complete.
NOTE: Your Apple Watch must be paired with your iPhone for Apple Pay to work. Also, make sure that your iPhone and Apple Watch are both up to date with the latest software updates for the best experience.
How to use Apple Pay post setup?
Once you’ve set up Apple Pay on your device, using it is very simple. Here’s how you can use it on 3 different scenarios-
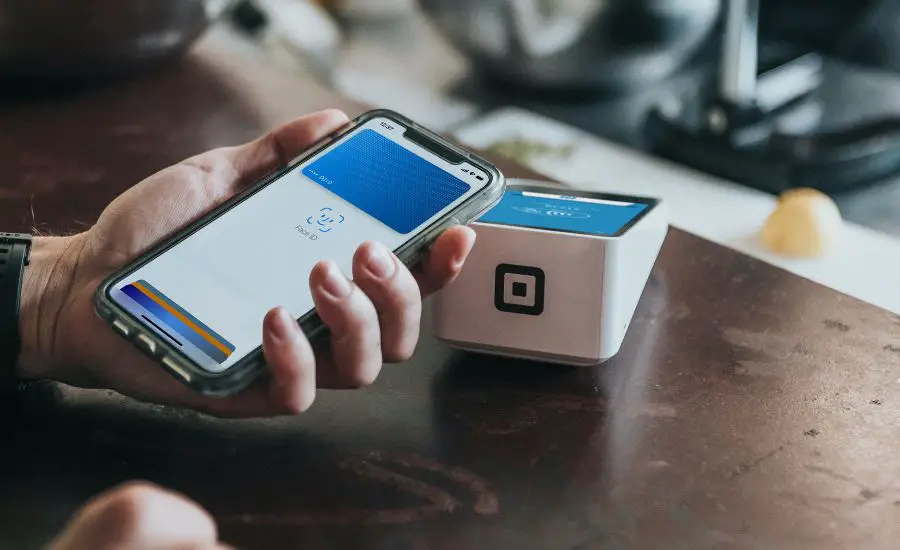
To use Apple Pay at a physical store
Step 1: Look for the contactless payment symbol on the payment terminal.
Step 2: When you’re ready to pay, hold your iPhone or Apple Watch closer to the payment terminal.
Step 3: Use Touch or Face ID to allow the payment.
That’s it! Your payment is complete.
To use Apple Pay for an in-app purchase
Step 1: Choose Apple Pay as your payment method at checkout.
Step 2: Verify your payment information, such as your shipping address and payment amount.
Step 3: Use Touch ID or Face ID to authenticate your payment.
Step 4: Your payment will be processed and the transaction will be complete.
To use Apple Pay to send money to a friend or family member via iMessage
Step 1: Open iMessage and start a conversation with the person you want to send money to.
Step 2: Tap the Apple Pay button in the iMessage app drawer.
Step 3: Enter the amount you want to send and tap on the “Pay” button.
Step 4: Use Touch Face ID to authenticate your payment.
Once the payment is complete, the money will be sent to your recipient.
Using Apple Pay is quick and easy, and it’s a convenient way to pay for things without having to carry around a wallet full of cards
Should I use Apple Pay? Is it safe?
Yes, you can definitely use Apple Pay with a peace of mind! Not only is it convenient, but also a very safe way to pay for stuffs.
If you’re still not convinced, let me break it down further with the technicalities. Apple Pay uses tokenization to protect your credit and debit card information. When you add a card to Apple Pay, it is assigned a unique token that is used for transactions instead of your actual card number. This means that your card number is never shared with merchants. Also, it is never stored on your device or on Apple servers.
Furthermore, Apple Pay uses biometric authentication (Touch ID or Face ID) to confirm your identity before allowing a transaction to process. So, even if someone gets a hold of your device, they won’t be able to use Apple Pay.
Lastly, Apple Pay also uses device-based security measures, such as the Secure Enclave. It’s primary job is to protect your data. As a result, your payment info remains encrypted and secure on your device, and can be accessed only by your permission.
End Note
For the record, Apple Pay is a very safe and secure way to pay for things. It’s a great option if you who want to keep your financial info secure. So, do not hesitate and give Apple Pay a try!